Wednesday, July 24, 2013

How To Protect Windows 7 From Viruses

Is there your PC suffered from viruses and you don't know what to do next, then don't worry here I will tell you how to protect windows 7 from viruses. Protecting your system from virus is not a difficult task but for this you have to be cautious of some things. In today's date most of people are used windows 7 PC. so I decided to write article on windows 7 to protect from latest viruses.


Here we are providing you some hidden tricks to protect windows 7 from viruses. These hidden tricks are below,  

Keep your Windows 7 Up to date
To shake off your system from virus, updating is necessary. Microsoft presents free tools and special security updates that can detect viruses and prevent windows 7 from them. Be ensure that these features works only when Windows automatic updating turn on.

Install an Antivirus in your system
To get rid of from virus, choose a trusted antivirus program for your windows 7 and update it time to time. Some antivirus programs are based on annual subscriptions but mostly anti virus software’s are free like Microsoft Security Essentials. You can easily download Microsoft Security Essentials from your browser.

User Account Control should be turned on
Be ensure that UAC (User Account Control) should be turned on. UAC help you to prevent unauthorized changes in your system. These changes can affect the security of windows 7.

To turn on UAC
It is very simple to turn on UAC. Go to the start button and then click on to control panel. Now open User account control settings. Now with these settings you can turn on or off your UAC.

Prevent from those emails and attachments file to whom you don’t recognize
Viruses can also be spread by emails and attachments. It is best to prevent from unknown attachments. Don't open the emails if you don’t know them. You can also block these attachments with the help of Microsoft Outlook and windows mail.

Proper use of Firewall
Firewall helps your Windows 7 to block viruses and hackers which attempts to harm your program when you download anything from your browser. So use of Firewall is must if you want to protect your windows from viruses.

If you are still getting various viruses problem to your PC such as Hanging, Restarting, and getting trouble with shortcut virus, then I would like to recommend Avast! Antivirus which is quite good and keep safe your PC from latest threads or viruses.

Tuesday, July 23, 2013

Avast 8 Free Antivirus

The Avast Free Antivirus software covers all the basics to keep your computer safe. This application offers your PC protection as you surf the internet. It also tests risky files and keeps a constant database to defend your computer from the latest online threats.


With so many malicious threats out on the web, it can be hard to browse safely without running into a bad link or harmful website. A good antivirus application like the Avast Free Antivirus accompanies you through the internet with protection against spyware, rootkits and Trojan viruses. One of the most common ways to contract a virus is through links in your email, and this antivirus software scans your inbound and outbound emails.

Main features of Avast Free Antivirus:
  • Anti-spyware built-in
  • Web Shield
  • Anti-rootkit built-in
  • Automatic updates
  • Strong self-protection
  • Virus Chest
  • Antivirus Kernal   
  • System integration
  • Simple User Interface
  • Integrated Virus Cleaner
  • Resident protection
  • Support for 64-bit Windows
  • P2P and IM Shields
  • Internationalization
  • Network Sheild 

Avast Free Antivirus even includes protection for several peer-to-peer file-sharing apps. This software also uses a heuristic scanning engine to proactively finds malware that tries to circumvent traditional virus scanners One feature that is absent from this program is an antiphishing option. Nevertheless, Avast Free Antivirus is one of the most effective on the market. This security application is ready to tackle and remove existing threats as well as detect and defend against new threats.

Another pair of outstanding features of Avast Free Antivirus are the Auto Sandbox and Code Emulator features. These features enable your PC to run in a virtual environment where potentially risky files can be monitored by the software. If you have any questionable applications you would like to install, you can first run them in Auto Sandbox without risking damage to your actual machine. The Code Emulator feature tests risky executable files in the test environment. If the suspicious files run like malware in the virtual environment, the Code Emulator will block block them - no risk to your actual PC.

To keep your computer guarded and up-to-date, you will need to make sure your antivirus software has a threat database that is current. New viruses and malware are continually being released, and the Avast database follows suit, defending your computer against any new threats that may try to harm your PC. By, or setting the software to make automatic updates (or by updating the antivirus software yourself), you can have peace of mind that your computer is defended against the latest viruses and malware.

If you find yourself in need of support, Avast has a variety of options to help you out with its antivirus software. If you would like to research your inquiries yourself, you can find FAQs, a user guide, knowledbase, tutorials and a support forum online. If you register your product, you can email a question to the support department or call the company's toll-free support.

The Avast Free Antivirus is an effective antivirus program that offers a multitude of features to detect, deter and remove potential threats to your computer, protecting your PC against malicious viruses and malware. These threats can be prevented or removed from your computer, and with Avast's virtual environment, you can test out suspicious files before you store them on your main hard drive. You can trust Avast Free Antivirus to keep your PC free of internet threats.


Download Now!

How to Backup SMS from Android to Memory Card

Do you know How to Backup SMS from Android to Memory Card? SMS are quite important to us, and we don't want to loose them. But sometime sms are deleted by us due to some reason. In this situation it is good solution to get backed up of it. Now at this time there are lots of mobiles comes and goes and we keep on changing handsets for our convince.  Most of us are taked backup of applications and phonebook of our mobile phone, but sometimes we miss to take backup of SMS messages which are sms from our friends. Sometimes I have my banking messages which are having balance records, my credit card SMS which are giving me transaction log, and hence my messages are giving me required and expected mobility. Today, I will focus on Android users, who are using Android mobile phones or tablet with sim and who are receiving SMS messages on their Android devices.


Let’s think, if you want to change your Android mobile phone and wants complete backup of all your SMS messages into another mobile, or you may need to have a complete backup of all your messages from your Android device to computer as you are formatting your Android mobile phone.

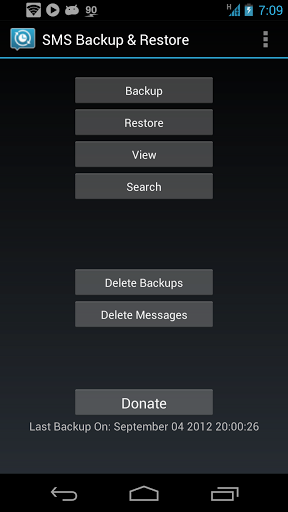
You can download Android app from google play store at free of cost, using this app you can take backup of your sms messages to computer/pc and restore from computer to android mobile phones or devices.


Android application to backup and restore sms messages from Android mobile devices is multilingual supports and having support for languages like Finnish, Russian, Spanish, French, German, Dutch, Portuguese, Italian, Polish, Swedish, Estonian, Simplified Chinese, Slovenian, Welsh, Czech, Macedonian, Turkish, Hungarian, Hebrew, Traditional Chinese, Korean, Norwegian, Danish, Romanian and Greek.

It’s quite easy to operate this application by any normal user, simply follow what has written as shown in print screen, and you can easily take backup of your SMS messages from Android mobile phone to computer or SD card and restore same back to android mobile phone.
Common Features for Backup & Restore SMS messages of Android Mobile phones Application are

- Application use XML format to backup text messages.
- You can schedule timings for auto backup text messages.
- As it’s XML format, it’s version independent. Backup of text messages from any version of android device, can be restored on other android phone with different version of application.
- Multiple option selection
- View/Restore all Messages or only selected conversations.
- You also can Delete all SMS Messages on android Phone.
- You can Email a backup file straight from the apps
- Backup format of XML can then be converted to other formats, and user can read on computers.

* Please note that this app does not support MMS (Picture/Audio/Video) messages.

There could be advertisements while using the application, if you want ads free application then you can buy some from market.


If you are having latest Android smartphone to be backed up for text messages, backup will be stored in internal storage memory, as new mobiles are coming without external card slots. 

Sunday, July 21, 2013

How to connect two PCs by LAN (Ethernet) for Internet

Most of people don't know how to connect two PCs by LAN. So today i decided to create article on how to connect two PCs by LAN. There are many ways to connect two PC's, but connecting them together by LAN is the easiest and most cost effective way. Plus, you can use this method for any number of PC ofcourse if you have... For this ,What you need:


  1.  2 PCs with Ethernet Cards or Onboard Ethernet

  2. Most new motherboards come with onboard Ethernet,
    you can check this out in
    My Computer > Properties > Hardware > Device Manager > Network Adapter.

  3. A Crossover Ethernet cable.

  4. The normal Ethernet cables won’t work, you must have a cross crimped Ethernet cable which can be used to transmit data in both directions.

  5. A Ethernet Hub

  6. A Ethernet hub is needed if you plan to connect more than two PCs. If you want to connect just two PCs, you can do it directly without a hub.

How to do it:
First of all Connect the crossover Ethernet cable to the LAN (RJ45) ports of both the PCs.

PC - 1:
  • Go to My Computer > Properties > Computer Name.
  • Change the Computer Name to A and Workgroup name to ABC and click OK to save changes.
  • Go to Control Panel > Network Connections.
  • Right click on your LAN connection and select Properties.
  • Select Internet Protocol (TCP/IP) > Properties.
  • Enter these values: IP Address - 192.168.0.1 and Subnet Mask - 255.255.255.0
  • Leave the other fields blank and click OK to save changes.
  • Go to My Computer > Properties > Computer Name.
  • Change the Computer Name to B and Workgroup name to ABC and click OK to save changes.
  • Go to Control Panel > Network Connections.
  • Right click on your LAN connection and select Properties.
  • Select Internet Protocol (TCP/IP) > Properties.
  • Enter these values: IP Address - 192.168.0.2 and Subnet Mask - 255.255.255.0
  • Leave the other fields blank and click OK to save changes.
After the connections and settings have been saved, both the PCs should be connected by LAN. You may need to restart both the PCs.

You can check if the connection is working by pinging one PC from the other.
For PC-1, Start > Run > CMD > ping 192.168.0.2
For PC-2, Start > Run > CMD > ping 192.168.0.1
You can view the PC's in My Network Places.

Also You can now use this LAN connection to play multiplayer games or share files.

You can also map a drive on another PC to a local drive by using My Computer > Tools > Map Network Drive > Select Drive Letter and network path of the shared folder on the other PC.

How To Open (.srt)Subtitle Files using Windows Media Player

When you purchase any movie or download any movie then in that cd/dvd you will find movie file along with .srt  file which is also known as Subtitle file. By default, windows media player doesn’t support subtitles (captions) in .srt formats, and it doesn't allow to paly that file but there is an easy way out. All you have to do is install a codec, and you’re set to run subtitles with any video file.

Step 1- Download DirectVobSub (VSFilter) 2.41 codec from here. Select the one which is supported by your operating system and Install it.

Step 2- Now copy the subtitle file to the folder where your movie is located. Change subtitle file’s name to the name of the movie.
For example if your movie’s name is (Sherlock Holmes (2009).DVDSCR.avi) then your subtitle file should read (Sherlock Holmes (2009).DVDSCR.srt).


Step 3- Once you’ve done this, Open the video file with Windows Media Player and you will see subtitles like you see in other media players.

Note- If you don’t see subtitles even after following above steps correctly, then try turning on captions from Window Media  player settings.

Open the video file -> right click anywhere in the playing area -> hover on “lyrics, captions, and subtitles” -> click on “On if available.”


That's all. Now you able to open .srt subtitle file using windows media player.

How To Monitor Website And Get SMS Reports

Do you really know at what time your website is down. I know most of people doesn't know that their website is gets down. For this problem I have great solution which is monitor your site by using google docs. By using Google Docs you can monitor your site and get SMS reports straight to your mobile sms inbox.

Here i made one small JavaScript which help you to monitor your website and give you SMS reports when website is down. Using Google Docs you can monitor your website’s up-time and down-time. The latest version of this Google Docs JavaScript based on website monitoring tool, and it is much much better than any other website monitoring site. It uses Google SMS channel to serve SMS so you don't need to pay for it. It also supports multiple websites and blogs. This website monitoring Script also supports Email Reports.


How To Do:
  1. Click here and get a sheet.
  2. Now go to file and make copy of it.
  3. You’ll see a new Website Monitor menu in the toolbar. Click Initialize and you’ll get a pop-up asking for authorization. Just say Yes.
  4. Put your Website URL and email address
  5. You can put multiple URLs by adding comma.
  6. Go to the Website Monitor menu again and choose “Start Monitoring”.

Full Source Code:
function init() {
if (ScriptApp.getScriptTriggers().length == 0) {
// Set up a monitor that triggers every 5 minutes
ScriptApp.newTrigger("websiteMonitor")
.timeBased().everyMinutes(5).create();
}
}
function websiteMonitor()
{
var response, error, code, urls;
// The script can monitor multiple website URLs (comma separated)
urls = SpreadsheetApp.getActiveSheet().getRange("B2").getValue();
urls = urls.replace(/\s/g, "").split(",");
for (var i=0; ii++) {
var url = urls[i];
if (!ScriptProperties.getProperty(url)) {
ScriptProperties.setProperty(url, 200);
}
// Trying to connect to the website URL
try {
response = UrlFetchApp.fetch(url);
} catch(error) {
// If URLFetchApp fails, the site is probably down
updateLog(url, -1);
continue;
}
code = response.getResponseCode();
updateLog(url, code);
}
}
function updateLog(url, code) {
if (ScriptProperties.getProperty(url) == code)
return;
ScriptProperties.setProperty(url, code);
var sheet = SpreadsheetApp.getActiveSheet();
var row = sheet.getLastRow() + 1;
var time = new Date();
var msg = "Down";
if (code == 200)
msg = "Up";
msg = "Website is " + msg + " " + url;
sheet.getRange(row,1).setValue(time);
sheet.getRange(row,2).setValue(msg);
// Send an email notification when the site status changes
var email = sheet.getRange("B3").getValue();
MailApp.sendEmail(email, msg, url);
var now = new Date(time.getTime() + 10000);
// Create an event in Google Calendar with an SMS reminder
if (sheet.getRange("B4").getValue().toLowerCase() == "yes")
CalendarApp.createEvent(msg, now, now).addSmsReminder(0);
}
Note: If you do not wish to receive SMS alerts, simply change the value of cell B4 from Yes to No. 

Saturday, July 20, 2013

How To Disable Facebook App and Game Requests

Are you getting so much tired and sick from facebook game and app request? If yes then i will tell you  how to disable facebook app and game request. Well, Games and Apps request are so annoying if you don’t even play or know about the game or applications request sent to you. If you have many Facebook friends, then you will get this types of requests daily, reason for that most of people are on Facebook for playing games and using shameless apps now don't worry you can disable it easily using this tutorial. What’s worst is they are flooding your notifications, so I am going to tell you that how to block Games and Apps request in Facebook.

Just follow the steps to Disable Facebook App and Game Requests :

  • Login to your Facebook Account
  • On the upper right corner you can see a drop down menu. 
  • On the drop down menu select Privacy Settings.
  • On Privacy Settings menu look for Blocked People and Apps
  • Click Manage Blocking
  • In Manage Blocking menu Block app invites and Block apps
  • In Block app invites,
  • Block invites from: Type your friends name that always sending you apps and games request.

  • In Block apps, Type the Games or Apps you want to block.
That's all you successfully blocked unwanted Games and Apps Requests notification. Facebook always give first preference to protect privacy of users, for that reason no one can send you these types of request to you.