Thursday, August 29, 2013

How to add Image or Photo to Facebook Comment

Have you notice earlier that facebook comments have image in it. And its look pretty cool to comment using image, but many peoples are still using old smiles to show reactions. But now onwards you can add your own image or photo to facebook comment, to do so many people are start searching to find out how add image or photo to facebook comment. So your search is stopped here, because here is methods to add image or photo to facebook comment. Well this is not any trick or hack, however this is a new facebook feature to add image to facebook comment.


Facebook allows you to easily post photos in several places, such as in albums, in messages and on walls. However, posting a photo in a comment is a little more complicated. There are two different methods to upload image in facebook comment.

Steps to add Image or Photo to Facebook Comment:

There are two different methods using which you can able to add image in facebook comment.

Method 1:
  1. Login to your facebook account.
  2. Then go to any post and click on comment link.
  3. Then you will see text field to add comment, and in same line at right corner you will see camera icon like below image.


  4. Click on that icon to upload photo.
  5. when photo uploaded, hit enter button.
  6. that.s all you will see that photo in comment section.
Method 2: 
  1. Upload your photo to a photo-sharing website. These sites provide unique link addresses for each photo you upload. Try sites such as Image Shack, Photo Bucket, Flickr and Image Venue.
  2. Click on your uploaded photo. Highlight and copy the link from the address bar at the top of your browser window.
  3. Log in to Facebook. Click on the post on which you would like to comment.  
  4. Type the code "<img src=http://yourphotolinkhere.com>" (without quotes) in the comment field. Paste the full Web address of the photo you would like to post in the comment to replace "http://yourphotolinkhere.com" Press "Enter," or click on the "Send" button under your comment.  
  5. Refresh your browser window to see your photo under the post's comments.
  6. Using this method you can also add animated image (.gif file).
Using above methods you can add following things in facebook comment:
  1. You can comment with text only. 
  2. You can comment with a photo or image only. 
  3. You can comment with both a text and a photo or image.
That's all now amaze your friend by adding images in facebook comments.


The Web Hosting Market - Too compelling to Leave out!

Ever since web hosting has emerged as the most popular form of hosting, industry giants jumped into the competition for gaining monopoly over this sector. The most compelling dimension of the web hosting market is that it allows individuals, organizations and institutions to make their own website. With the internet said to be the fastest growing sector in the history of business, the web hosting industry has experienced a massive expansion in just a few years.

With the potential of entrepreneurship and opening up a new company with minimal investment, web hosting is considered to be the ultimate start-up business, allowing small hosts to stand up in-front of IT sector giants. The age old notion that a wider net catches more customers is obsolete now. In-fact the emphasis has shifted to focusing on the right areas, rather than having a wider net. This is what makes people buy web hosting services in general.

As more and more people are moving forward to buy web hosting services, companies have started to give out attractive offers in terms of disk space and bandwidth, to optimize their sales. There can be various types of web hosting companies. The main classification is the free web site hosting and the paid web site hosting services.

Now choosing which web hosting service to go for, and buy hosting services, happens to be the real daunting task. In case of free web hosting services, the user has the right to upload his or her web site content on the server space that is provided by the web hosting company without any cost. Free web hosting services is more lucrative for individual users. On the contrary, paid web site hosting services are best suited for professional web site owners, big organizations and institutions.

There are a few shortcomings in using the free web hosting services. When using the free web site hosting service, you are forced to place the ads and banners by the web site hosting company on your web pages while the revenue collected from that advertisement goes to the company. Hence people opt to but web hosting services instead of using the free services. The advantages of buying web hosting services is that ads and banners placed on your web site are according to your will and the revenue of the banners and ads placed on your web site goes in your pocket. Also in some case of free web site hosting, the domain name of your web site starts with the web site hosting company name followed by your web site name. This is not the case of paid web site hosting service. You get a unique web site domain. The web space provided by free web site hosting service is limited whereas in case of paid web site hosting service you can buy the web space according to your requirements.

Having said the pros and cons, paid web hosting services emerges as a growing sector with a promising future. More and more people are inclined to buy web hosting services at the end of the day.

Wednesday, August 28, 2013

How to Unlist your number from Truecaller App

Truecaller is a App which synchronizes your mobile contact number with truecaller database, and unnecessary sharing with world. Using this truecaller app any one can easily get your details by searching your number. And it is so annoying. So basically this app includes phones number captured from every device it interacts so making a social bond between people who just have a number but do not know the name, so this app can help them out. But still this app is regarded as a privacy breached and some people might want to remove or unlist their phone number from this app or website.

So we can  use official method to remove your number from truecaller app to do not show your phone number to anyone and completely unlist it out from truecaller. Well yes obviously the company that creates this kind of website or app has a mandatory rule to include some possibility through which anyone can get rid of their application.

Follow methods to Unlist your number from Truecaller App:

  1. Open Truecaller unlist page by clicking here.


  2. Now you will see page something like above, just choose your Country and then enter your phone number.
  3. Now you need to enter the Captcha code as mentioned and then you need to click that Mail kind of icon.


  4. That's it now you will see that Successful message like above so that means your number has been unlisted or removed from Truecaller.
  5. So now it might take like 24 hours for getting fully unlisted so you might have to wait.
Note: Once you remove/unlist your phone number cannot be added later again.

Tuesday, August 27, 2013

How to copy and paste text on Android Phone

Often it's much quicker to copy and paste text than to retype it completely in android phone. Fortunately for Droid users, it's easy to copy and paste text on Android phones as that is one of the phone's default features.
Trying to copy/paste text on your Android device can be a hassle. Most times the text isn’t even able to be selected, leaving you with no options. Who hasn’t gotten a URL via chat client that doesn’t allow links or copying text? You probably won’t do a lot of text editing on your Android phone. Well, no major editing, such as for a term paper or ransom note. From time to time, however, you may find yourself wanting to fix a word.


After selecting a chunk of text or all text on the screen, you can then cut or copy the text and paste it elsewhere. Copying or cutting and then pasting text works just like it does on your computer.

Follow these steps to copy and paste text on Android Phone:
  1. Select the text you want to cut or copy.
  2. Long-press the selected text.
    Touch the highlighted text on the touchscreen, and keep your finger pressed down. You see the Edit Text menu with three items: Cut, Copy, and Paste.
  3. Choose Cut or Copy from the menu to cut or copy the text.
    When you choose Cut, the text is removed; the cut-and-paste operation moves text.
  4. If necessary, start the app into which you want to paste text.
  5. Touch the text box or text area where you want to paste the copied or cut text.
  6. Position the cursor at the exact spot where the text will be pasted.
  7. Long-press the text box or area.
  8. Choose the Paste command or touch the Paste icon.
    The text you cut or copied appears in the spot where the cursor was blinking.
The text you paste can be pasted again and again. Until you cut or copy additional text, you can use the Paste command to your heart’s content.

Monday, August 26, 2013

Difference between Shared Hosting and VPS Hosting

Many new web developer have one question in their mind that what is difference between Shared Hosting and VPS Hosting ? There are more plans available in market but here we discuss about Shared web hosting and VPS web hosting. This article will help you to choose better web hosting, which suits you Best. First of all let us see Shared hosting plan and then we will go to the VPS hosting plan.

Shared Hosting:
Shared hosting plans are among the most popular of all web hosting options, due to affordability and price. Most web hosts offer basic shared plans starting around $5-10 USD/month.


Shared hosting plans :

With a shared hosting plan, your website, email or other deployment is hosted on a server that is shared by others who have similar shared hosting plans. This allows hosting companies to offer shared hosting for cheap prices, as these hosting plans do not require their own dedicated machine per customer. Multiple shared hosting plans can be deployed from a single server and even a single instance.
Additionally, this hosting option requires the least amount of core maintenance, as most hosts may assign a unique or rotating administrator to their customers with shared hosting plans. This administrator not only keeps the system up-to-date, but also provides routine, admin level root maintenance tasks.
Shared hosting plans are not necessarily slower than VPS or cloud hosting plans, although most shared plans are not as fast as dedicated servers. Much of the speed of a shared hosting plan is determined by the other shared plans that are hosted on a particular server.
For example, if you purchase a shared hosting plan for your blog, your blog will obviously be hosted alongside several other websites, blogs or deployments on the same server. If another shared website on your server gets a traffic spike or high amount of website visits, than the distribution of server speed may effect the other shared plans on the particular server. Thus, your website may become slower.

What are the advantages of shared hosting?
  • Cheap
  • Managed by an Administrator
  • Unlimited bandwidth
  • Unlimited storage
  • Simple to use, learn and operate
What are the disadvantages of shared hosting?
  • Managed by an Administrator
  • Limited speed
  • Not great for websites or deployments that get a lot of traffic
  • Less security than other options because deployment is stored on the same server in the same hosting manager as other shared hosting customers. If someone gains access to the root level hosting of a hosting manager, they have access to all shared plans that are deployed from that instance.
Who should use shared hosting plans?
Low to medium traffic websites and blogs are ideal for shared hosting plans, along with websites that have few webpages, or portfolios, etc.


VPS Hosting :
VPS, or virtual private server hosting plans are considered to be a step up from shared plans, but not as advanced as dedicated servers. Most web hosts offer VPS plans ranging from $25.00 USD per month to $250.00 USD per month, give or take.


VPS hosting plans :

With a VPS hosting plan, your website may not necessarily have its own unique machine/server. However, you still retain many of the benefits of having a unique machine/server, because most VPS plans are deployed via virtual machines.
With a shared hosting plan, mentioned above, you share a server with other shared hosting plans and are managed by an administrator. With a VPS hosting plan, you may share a machine/server with others, but your deployment is unique and you are for the most part, the administrator.
Consider it like this, you may run VMware or Parallels on your personal computer so that you can deploy other operating systems. A VPS hosting plan is similar. A computer or server utilizing VPS may have virtualization software installed, in which you are assigned your own deployment, or your own virtual machine or host manager software.
This lets you manage more aspects of your deployment, and most hosting providers also allow VPS users root access and management.
However, because one machine/server may be host to several VMs (virtual machines), VPS hosting, in a way, is shared hosting.

What are the advantages of VPS hosting?
  • Offers most features of a dedicated server, at a reduced price.
  • Managed by you, but many VPS hosting providers offer assistance and support for VPS customers.
  • Scalable to different plans, for increased or decreased usage or website traffic.
  • Usually more assigned speed with set server specs. VPS plans give you a defined amount of CPU, RAM, Disk space and bandwidth.
What are the disadvantages of VPS hosting?
  • Managed by you or your administrator. More complex and greater learning curve than shared hosting.
  • Shared on server.
  • Limited bandwidth.
  • Limited storage.
  • Limited resources.
Who should use VPS hosting?
Many low traffic websites and mid traffic websites alike use VPS hosting. It’s significantly more affordable than a dedicated server, while still providing root level access and self administration. However, it’s not as powerful as a dedicated server, because it’s a shared server deployment.

How to find If someone Is using your Facebook account

Do you know how to find If someone Is using your Facebook account. No? In this article I will tell you how to find if someone is using your facebook account. Facebook offers to create 2nd sign in seal to your account. Using this you can create sign in seal, in that you can allow selected devices that can be use to login to your Facebook account. So take a look of this feature.
  • Have you ever suspected that someone else is accessing your Facebook account?
  • Have you found any suspicious activity on your Facebook profile? 
  • Want to sign out from your Facebook account remotely? 
  • Forgot to log out from Facebook?
  • Someone steal your login details via phishing?
Facebook will help us to roadblock suspicious logins form any computer, mobile or any third party apps that recently access your account. Here I decided to share a security feature of Facebook that easily identify and send you email notification if anyone is secretly logging in to your Facebook account.


Facebook allows users to identify the list of computer/mobile devices that you have logged into your Facebook account. It also displays date and the approximate geographic location(not exact) of that device based on its IP address. If you come across you have logged in from an unknown device or unknown place 'Click the End Activity' to log out the session from that unknown device.
Where can I find these setting on Facebook?
Log in to your Facebook account>>Account>>Account settings>>Security>> Active sessions.
Now you can see the computer/mobile devices you have logged into your Facebook account and the date of your last access to Facebook.
For more safety to your Facebook account we requested to activate mobile sms alerts and email notifications. If someone else tries to log in to your Facebook you will receive notification via email and sms instantly, and if it was an unauthorized access you can take further steps to end that session using the above method.

Saturday, August 24, 2013

How to download facebook video in Android Mobile

Do you know you can download facebook video in Android Mobile. Lets see detail procedure to download facebook videos in your android phone.As we know there is no option available in Facebook to download a video to our computer and phone as well, we can just watch them in Facebook.

However, we can get our favorite videos directly to our android smart phone using a third-party application called as “ES file explorer” which is available to download for free on Google play store. With using this app, we can store any Facebook video very quickly, and it’s very easy too.  Just scroll down to read step by step fully explained tutorial.

How To Download Facebook Videos in android Mobile:

As I said earlier, we need to use a third-party application to do this. I explained the whole process from the scratch, especially for newbie’s.
  • Go to Google Play store application, search for ES File explorer app there. Once you found it, download and install the app in your device.
  • I hope you already have Facebook android App installed in your device, otherwise download & install it from the same Google play store.
  • Now open the Facebook app, and log in there using your email id and password as usually.
  • Search / open the video which you want to download, and then touch on the play button which appears on center of the video screen.
  • Once you taped on Play button, it will open a pop-up window like shown below.

  • There you need to click on “ES Downloader” if you wish to download that video. Immediately you will see download process of your video.
  • Once downloading has finished, you will see your downloaded video in gallery of your smart phone.
That’s all. Now you can start downloading all of your favorite videos to your smart phone, without any cost. The advantage of downloading FB videos to your phone is you will be able to watch them anytime.

    Friday, August 23, 2013

    Free Backlinks From Dofollow But High PR Auto-approve Websites

    Today we, Quick Money Saver, would share with you a fresh list that can help building free backlinks from over 600 do-follow, high PR (PageRank) and auto-approve websites.

    What is Backlink?

    Backlink refers to any link from other webpage pointing to a specific webpage. Theoretically, every backlink (no matter it is from internal webpage or from external webpage) can be useful for link building purpose.

    Why Backlink is a MUST for SEO (Search Engine Optimization)?

    Most search engines (Google, Bing or Yahoo etc) believe that more quality backlinks pointing to a web site, the higher authority should the site be. Search engines like Google determine website PageRank (PR) by seeing how many other websites have quality link(s) pointing to a site. Quality backlinks are therefore useful for popular search engines to position a site during user searches and become a must for SEO (Search Engine Optimization) and site authority building.

    Why Dofollow?

    Do-follow backlink refers to any link from other website that does not carry rel=nofollow tag. Google only counts dofollow backlinks and recognizes corresponding link juice passed to your site. Google, however, does not count nofollow backlinks and so they generate zero link juice. Therefore, dofollow is a necessary requirement for website authority building and SEO (Search Engine Optimization).

    Remark: nofollow backlinks, which do not pass any link juice, can still be useful for generating website traffic if visitors come to click on them. They will also help making your backlink combination appears to be natural for Google, because 100% dofollow backlinks can be highly suspicious for most search engines.

    Why Higher PR the Better?

    Suppose that your site has any other outbound link (external webpage), it can help this external webpage better if your site ranks PR5 instead of PR1. Moreover, you shall always be aware of pointing to any outbound link with only PR0 or even NA (i.e.: no Google PR) because this external site may have likely been too new or even been penalized by Google. If this is the case, Google may suspect you may have provided link to a "bad neighborhood" and this will certainly hurt your site ranking in Google searches. So it is surely higher PR the better for link building, and minimum site rank should be PR2 to PR3, depending on the competition level of selected keyword(s).

    Why Need Auto-approve?

    If a website does not auto-approve comments (if any) of visitors, then probably the webmaster will only approve non-spammy comments and filter out all the rest. So even you submit 100 times, you may still not get one approved by the webmaster and it will be a complete wastage of your valuable time for site authority building. On the contrary, you will get a 100% acceptance rate if a website can auto-approve your comments instead. Auto-approve websites can also help speeding up your link building campaign and improving overall chance of success.

    The above are the real reasons why we (Quick Money Saver) now brings you a fresh list resource that can help building free quality backlinks from over 600 do-follow, high PR (PageRank) and auto-approve websites. This free list is compatible with common SEO link submission software such as Scrapeboard, Scrapebox, Xrumer, Scrapejet etc for website authority building.

    You may now Download this list here for FREE.

    Do not try to build all 600+ quality backlinks overnight, or your sites can be easily caught and banned by common search engines such as Google, Bing or Yahoo etc.

    Disclaimers: None of the websites in the list are under our control. Please note that abuse of this free list or improper link building activities may cause banning penalty of your sites by common search engines such as Google, Bing or Yahoo etc. Users must use this authority building resource with their own care. QMS (Quick Money Saver) team bears no responsibility for any consequence that may arise.

    How to Optimize Blog for Google Ranking

    Do you know how to optimize your blog for Google ranking. following how to guide will help you to increase your blog ranking in Google. Consistently add new content to your company Blog. Fresh, original, insightful content remains your best tool in search engine optimization. Blog leads to high real-time results on Google that will be maintained for the long-term. Low-quality content, not articles and knowledge that readers notice not useful.

    Stick with solely posting links on sites with relevant content. Websites with a typical theme and content usually carry additional weight than a website covering too different topics. Links on websites while not a general topic will really hurt your cause instead of facilitate. Avoid links on websites unrelated to your site’s core message or topic.


    Keep the proper quite company. during this new search engine world, having the incorrect types of friends will price you. the maximum amount as you ought to keep yearning for links from high-quality sites, avoid obtaining them from content farms and different “spammy” resources. You’ll appear guilty by association.

    Use CopyScape. this is often software (www.copyscape.com) that scours the net to make sure that your content is original and not duplicated. you'll contemplate reaching out to a number of these web sites with an expert however firm request to delete content copied from your website. In some cases you'll need to rewrite a number of your content.

    Manage your web site and finish off low content or duplicate pages. peruse your website from time to time to visualize if you have got content that's duplicated throughout your web site. make certain titles and meta tags are differentiated therefore Google picks up every page separately. A logical thanks to begin this method would be to put in Google Webmaster Tools.

    Don’t recycle concepts. notwithstanding you write one thing that’s “original,” if it’s terribly kind of like what you have got on another page – or which will be found in dozens of places across the net – it’s doubtless to be deemed uninteresting to searchers, that might ultimately have an effect on your site’s ranking if they click away quickly.

    Supply the proper types of links. It’s still a decent plan to purpose individuals at different high-value sites, or perhaps social profiles on Facebook, Twitter, and LinkedIn. Doing therefore shows Google and therefore the different search engines that you’re a real supply of knowledge on-line, not simply the destination for content.

    Keep faraway from overpowering advertisements. A high variety of advertisements is one among the ways in which that issue how Google measures identifying a low-quality website. If you are doing ought to have ads, make certain they don’t overpower your website’s content. Having links to websites dominated by ads might hurt your rankings yet. Have a quick web site. In recent years, Google has began to concentrate to a number of the finer points with their search engine listings, and confirmed that how briskly your website masses is currently a determinant within the algorithm. Not solely could be a quick web site sensible for SEO however the faster a page masses, the faster your shoppers will notice what they’re yearning for and therefore the additional doubtless they're to shop for.

    Bogger outreach. decision and email Bloggers who write concerning topics associated with your web site. supply to write down content and guest posts in exchange for links back to your web site. If you sell a product, supply samples.

    Thursday, August 22, 2013

    How to Make Money from Blogging

    Do you know you can make money from blogging. Yes blogging gives you power to make real online money. Webmasters have a lot of opportunities to make money out of creating blogs. The most ideal thing to making money from blogging is to join affiliate programs, sell advertising space, marketing services, enhance customer relations and solicit contributions. This technique to make money can be done along or through a combination of any method.


    Let Businesses Use Your Space
    If there are plenty of visitors on the blog, it can be viable alternative to sell advertising space to monetize the website. An enrollment to an advertising program allows the webmaster to earn money by getting relevant advertisements onto available blog posts. Money is earned when a website visitor clicks an ad. This may not provide a fast means of income; however, this is a viable means to receive residual earning which can be possible as long as the site exists.

    Participate in Affiliate Programs
    Webmasters will be able to advertise a digital or physical product through affiliate programs. Whenever a product is sold, the webmaster will earn a commission. This technique of making money blogging does not need a huge traffic; however, this will demand some people who have a strong trust to the webmaster. When a webmaster chooses to go through with this type of monetization, it is important that he will ensure the relevance of the affiliate program to the niche of his blogs in order to keep sale conversions.

    Seek Voluntary Contributions
    Webmasters can also make money blogging by asking visitors to make a financial contribution. It is important for a webmaster to set an information page through which the readers will have an idea that the website they are visiting is operated by contributions. Do not forget to place a DONATE button to allow easy contributions from visitors. This is a great means to make money blogging especially if the topic of the blogs is finance and business.  A blog that provides respectable and sound advice will expectedly get the trust of readers facilitating loyalty.
    If a webmaster possesses a certain set of skills, he is then able to provide services on the blog. For instance, a freelance writer can make a blog offering editorial services. A simple showing of skills and providing contact information to get business opportunities is a great way to make money while a webmaster maintains a blog.

    Build Customer Trust
    It is not very necessary that a blog is focused on newly launched business ventures. Clients and customer can also be interested with personal blogs. Say, if a blogger can have the ability to build a website, through which he can interact with potential and existing clients, has a brick and mortar job. This helps build trust between customers and owners as well as becomes a means for the website to earn profits.

    Consider Important Elements
    Generally speaking, the following elements are necessary when you wish to earn money through blogging.
    • Blog publishing software
    • RSS/syndication
    • HTML/CSS
    • blog comments (and comment spam)
    • Feed aggregators
    • trackbacks
    • pings
    • Search engine optimization (SEO)
    • full vs. partial feeds
    • email
    • page rank
    • social bookmarking
    • page rank
    Making money out of blogging is just a simple task to do for the webmaster as long as he has the vision to earn in the first place. His skills and own knowledge will help him come up with ideas on how his blogs will help his website monetize. With just an investment made from initiative, a webmaster can become a successful website owner.

    Tuesday, August 20, 2013

    Get $97 OFF On Dreamhost Web Hosting

    Get $97 OFF on dreamhost web Hosting Only on DreamHost. DreamHost was established in April of 1997 by four computer science undergraduates. Since then, they have grown to over 1,500 servers and a full time staff of over 100 employees.
    DreamHost currently offers shared web hosting, Virtual Private Servers, Dedicated Servers, and Cloud Hosting services to their clients. For shared hosting, DreamHost is an “unlimited host” that offers unlimited disk space and bandwidth under one single plan.


    Our Dreamhost Review

    DreamHost allows clients to have a 2-week trial before they have to commit to a plan, which inclues VPS, Shared, and Dedicated servers to choose from. An added bonus to this is that their VPS and Dedicated servers are priced really low while their Shared plan is about average, unless of course you use our $97 money off coupon below. For this reason you will find our DreamHost Review quite positive.

    What’s Good About DreamHost?
    • Multiple features – This is a little broad,, but DreamHost has a lot of cool features that other companies don’t have. unlimited space and bandwidth, a free domain registration, auto-installation of several software, shell access, and the list goes on and on.
    • Customer Support - DreamHost offers customer support in different ways such as forum, wiki, email and most recently live chat. Support normally gets back to you in a matter of minutes for small problems and the service is very friendly.
    • Server Performance – Always upgrading there servers with new technology, DreamHost has some of the best servers out there. Response tracking and up-time tracking are some key features that DreamHost has on lock.
    • Security – In our opinion, we believe that DreamHost is one of the best secure web hosts out there. Possibly the best. 12 years of experience and the option of having one-click auto upgrade for their software installations helps them out in this area.
    • Bang for your Buck – DreamHost has really great service for a reasonable price that gives customers what they need to strive. If you our $65 money off coupon, you’ll get the DreamHost service at a very cheap rate.
    • Unique WebPanel – Unlike other web panels where you have to multiple log ins for billing access and hosting access, DreamHost gives you all your account information in one spot to remove confusion and frustration.
    • Refund Service – DreamHost gives you a 97 day money back guarantee, which is one of the longest trial periods available. This is a great attribute for those who find the need to test out multiple web hosting services and compare them all to make a decision.

    $97 off any one/two year DreamHost hosting:

    By clicking the link below, we are offering you a chance to save $97 off any one/two year package for DreamHost hosting. You simply will not find such a good offer anywhere else. To use the voucher, just click the coupon code and it will take you to the Dreamhost site.

    Please note that there is nowhere to input the code. What you will see on the Signup form during the checkout process is 1 Year prepaid at $22.40 ($1.86/mo) (regularly $119.40/yr)”. This shows the discounted rate incorporating the code below. You will also see after going to the site via the link below all the pricing information on the homepage is different (to take into account the code).

    How to get $97 off on DreamHost Web hosting:
    1. Go to DreamHost site by clicking here.
    2. Then choose shared web hosting package.
    3. Signup yourself and during checkout enter below coupon code to get $97 off

    Coupon Code:

    TUTSOL97

     Use above coupon code to get $97 off on any web hosting package.

    Sunday, August 18, 2013

    Nokia Lumia 625 Specification and Review

    Nokia has recently released the Lumia 1020 windows phone and within just few days, now nokia announced brand new Smartphone from Lumia series that is Lumia 625, which is said to be the successor to Lumia 620. This device comes with a 4.7″ WVGA touchscreen and is powered by a 1.2 GHz dual-core Snapdragon S4 Plus process along with a RAM of 512MB. A 5MP camera with autofocus is equipped on the rear end while the front camera is a VGA.

    Like the other Lumia series, the Nokia Lumia 625 also comes in a variety of colors taht is Orange, Yellow, Green, Black and White with an option to change the back shells as per your choice. Nokia has provided 8GB internal memory and can be expanded up to 64GB via microSD card.
    A non-removable 2000 mAh battery is also embedded into the device to give maximum battery backup to the Windows Phone.
    If you don’t find your device battery lasting long, these tips will help to improve battery life of Windows Phones.


    Nokia Lumia 625 Specification: 

    Features:
    • Big 4.7” LCD screen and lightning fast internet speeds with 4G for a bigger, better, faster smartphone experience
    • Unique semi-transparent design with changeable shells in 5 exciting colors
    • Have fun with your pictures, anytime, anywhere with Nokia smart camera and Cinemagraph
    • Leading experiences from Nokia apps include maps and navigation from HERE, plus free Nokia Music streaming
    Technical Profile:
    • Operating system: Windows Phone 8
    • Memory:
      • 512MB RAM
      • 8GB internal user memory
      • 7GB SkyDrive cloud storage
      • MicroSD support up to 64GB
    • Display:
      • 4.7’’ IPS LCD WVGA (800 X480)
      • 201 ppi, 2.25D curved glass
      • Brightness control
      • Color boosting
      • Corning Gorilla Glass 2
      • High brightness mode
      • Sunlight readability enhancements
      • Lumia color profile
      • Wide viewing angle
      • Super sensitive touch for nail and glove usage
    • Processor: 1.2GHz dual-core Snapdragon S4 (MSM 8930)
    • Camera: Main camera:
      • 5Mpix, LED flash, 1080p @30 fps;
      • Secondary camera: VGA (480p);
      • Cinemagraph , Panorama, Smart Camera, Nokia Glam me, Skype video calling
    • Size: 133.25 x 72.25 x 9.15 mm, Weight: 159g
    • Connectivity:
      • USB2.0
      • BT 4.0+ LE,
      • WLAN IEEE 802.11b/g/n
      • A-GPS and Glonass
      • 3.5 mm audio connector
    • Sensors: Accelerometer, Proximity, Ambient Light Sensor
    • Battery: 2000mAh integrated battery
    •  Audio: 1 microphone, HD audio, Uplink noise cancellation, Dolby Surround headphone audio playback, FM Radio
    Networks: RoW LTE variant:
    • GSM 850 MHz, 900 MHz, 1800 MHz, 1900 MHz
    • WCDMA 2100 MHz, 850 MHz, 900 MHz
    • LTE 3 (1800 MHz), 7 (2600 MHz), 20 (800 MHz)
    • Speed: HSPA+: UL/Cat 6 (5.76 Mbps) ; DL/Cat 24 (42 Mbps); LTE Cat 3: UL/50Mbps; DL/ 100Mbps
    Lumia Services:
    • Here Drive Beta, Here Maps, Here Transit, Nokia Music, Smart Camera
    Colours:
    • Orange, bright green, yellow, and white and black
    Operating times:
    • Talk time GSM: up to 23.9 hours
    • Maximum talk time (3G): Up to 15.2 hours
    • Standby time: Up to 23 days
    • Video Playback time: Up to 6.8 hours
    • Music Playback time: Up to 90 hours
    Nokia sales package accessories:
    • Charger: AC-20 (AC-10UC for Taiwan only)
    • Cable: CA-189CD (CA-190CD for Taiwan Only)
    • Battery: Pre-installed: BP-4GWA 2000 mAh
    • Headset: WH-108
    • Guides: Booklet
    Nokia releasing couple of windows phone to compete with the leading Android Smartphone manufactures like Samsung and HTC at mid-range levels so that it can grab its lost position as the #1 in the game.

    How to Send Private Messages in Google Plus

    Now days, many people uses google+ to share theirs photos, ideas and to chat with friends. But many people doesn't know to send private message to google plus friend. So, I will tell you how to send private messages in google plus. If you’re on Facebook, then it is very easy to send private messages to someone without being tracked. But, it is not the case with Google Plus. Although there is an option in Google Plus to send private messages, it is not publicly visible and so many people won’t be aware of it. In this article, let us see how you can send secret messages to your Google plus friends.


    How to Send Private Messages in Google Plus:
    1. Login to your Google Plus profile.
    2. Go to your page and type your private message. In the ‘To’ field, simply delete the default tag ‘Friends’ or ‘Public’ whatever you’ve set and enter the name of the person with whom you want to share your post with. You can add multiple people in this step.
    3. Next, click on the down arrow beside the ‘To’ section and select ‘Disable reshares’.


    4. Now, click ‘Share’.
    Now, All the recipients who’re tagged in your post will receive a notification from Google+ that you’ve sent them something and it won’t be visible to anyone except to those who’re tagged in your post. And they can able reply back to your post.

    Thursday, August 15, 2013

    How to Download Song Lyrics in Windows Media Player

    Do you know how to download song lyrics in windows media player? No. Then I will tell you how to download lyrics. Well there are many online website's which you can use to get song lyrics but what about getting all the lyrics directly right in front of you as soon as you play any song. Well yes using simple plugin called "MiniLyrics" you can download song lyrics and even stream them as your song processes. So now by stream I mean, that it will download your song lyrics on the go instantly but it will even start highlighting the lines for you as soon as your song starts playing, so the current line being sung will be highlighted so you know where the song is, so its just amazing.


    How to Download Song Lyrics in Windows Media Player:
    Minilyrics online lyrics database it has huge databsae and its even expanding day by day as new song are stepping in, so you are not going to face any problem, if you download or purchase out any new song, so as soon as you have the song you will have all the lyrics with you.

    So now another good part about Minilyrics you have full preferences panel to customize your lyrics window to make it look like it's a part of you media player. So you will dozens of skins which you can apply easily. So now lets see how to download and use it.
    1. Download Minilyrics Free Version.
    2. Now you will get the setup file, just run it and install the software.
    3. Now your software is install, now just play any song and you will see another window Minilyrics will popup.
    4. It will download Lyrics for your song automatically and will start streaming it up for you, you will be able to lyrics going side by side song playing.
    So this way you can get your all favorite songs lyrics with you.

    Saturday, August 10, 2013

    How to Create Direct Download Link's for Google Drive Files

    Many people wants to share their file online, for that they widely use dropbox or box account, but it have limitation,  such as bandwidth restriction. So today i will tell you how to create direct download links for your google drive files. Recently my box account was temporarily disabled due to heavy traffic attack from different websites, as all were sharing my link's, so I started searching for some alternatives where I can host these small files and get direct download at the same time as dropbox was offering me. So I came across many website's like mediafire and other one's but I got my hold on Google Drive as I trusted the Google name so I started searching for some easy ways to get direct download link for Google Drive files.
    Well I came across one easiest way that works well and will simply allow you to create direct download link for any file you upload on Google Drive, now let me remind you that you are going to get 5GB free space, so make sure your file's are small in size but if you are wishing to host files in bulk then you can even purchase a nice plan from them. So now lets jump in to the tutorial on creating direct download link's for files uploaded in Google Drive.

    How to Create Direct Download Link's for Google Drive Files:

    Now the reason we are going to use Google Drive is that it offers free 5GB space instead of 2Gb that is offered by dropbox and the second best one is that it offer's unlimited bandwidth, so anyone can download your files from different nation's and that too how many they wanted too. So let's see how it can be done.
    1. Open Google Drive & Sign In.
    2. Now upload file's to Google Drive.
    3. Now when the file is uploaded right click on it and Under Share click on Share.
    4. Now you will see a pop-up window, just under Who has access ? option, choose Public (this is important as direct download only works if file is public)
    5. Now just copy the ID of that file like in the image below.
    6. Now replace below xxxxxxx with that ID you just copied.
      https://docs.google.com/uc?id=xxxxxxxxxxxxxxx&export=download
    7. Now this is your direct download link for that Google Drive file.

    So now you can shorten this big URL with any URL shortener I would recommend goo.gl or bit.ly and now you can share this small URL with anyone and as soon as someone clicks on the links download will start right away. So now no matter how much bandwidth people access your links will be alive always.

    Friday, August 9, 2013

    How to Make Responsive AdSense Ad Units

    Now days many websites are responsive, so what if they want to place adsense ad units. but till now we don't know whether we can place responsive adsense ads on our website. So relax, today i will tell you hoe to make responsive Adsense Ad units.

    Earlier also people have already experimented on this thing and obviously they have created responsive ad designs but now we are talking about official update from Google which is much more stable and legal to be applied, yes now you do not worry about manipulating the code unless its under terms.


    Responsive Adsense Ad Units:

    Well now if you visit your AdSense account you will see that under New Ads creation wizard you will find another head called "Other - Responsive" so now under this one you have once simple ads unit that’s responsive and will work on the CSS base, which you need to create.

    Well this is in BETA testing, still its working like a charm. Now this code is already Asynchronous Loading enabled so you will not see that two code choosing option. Now as you choose the code you will get your code somewhat like below including some default @media tags for responsive CSS structure, but will need to manipulate these codes according to your website's requirement.
    <style>
    .tutsol-responsive-ad { width: 320px; height: 50px; }
    @media(min-width: 500px) { .tutsol-responsive-ad { width: 468px; height: 60px; } }
    @media(min-width: 800px) { .tutsol-responsive-ad { width: 728px; height: 90px; } }
    </style>
    <script async src="http://pagead2.googlesyndication.com/pagead/js/adsbygoogle.js"></script>
    <!-- tutsol Responsive Ad -->
    <ins class="adsbygoogle tutsol-responsive-ad"
         style="display:inline-block"
         data-ad-client="ca-pub-123456789012345"
         data-ad-slot="1234567890"></ins>
    <script>
    (adsbygoogle = window.adsbygoogle || []).push({});
    </script>
    Note: This is only for demonstration purpose and it will not work for your website, you need to create your personal ad code right from your account.

    So now you able to add this code to wherever you want  responsive ad design but make sure you you customize the @media tags according to your website, else it won’t work.

    Tuesday, August 6, 2013

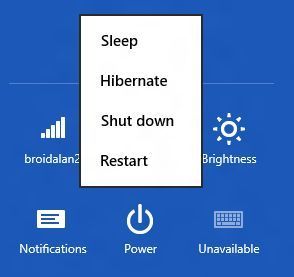
    How to enable Hibernate mode in Windows 8 PC

    Do you know how to enable hibernate mode in windows 8 pc? No, then don't worry today i will tell you how to enable hibernation mode on windows pc. Lets, first of all understand what is hibernate. Hibernation saves electrical power. After hibernating, the hardware is completely powered down (just like for a regular shutdown). Therefore a hibernated machine uses no more electrical power than one which is switched off. Hibernation is a means of avoiding the burden of saving unsaved data before shutting down and restoring all running programs after powering back on.

    So lets do it step by step, Hibernating your pc is very helpful when you have some urgent work and simultaneously you don't want to loose your current work, that time this feature comes in picture, just put your pc in hibernating mode, to get your all files and mails as it is, as that was before hibernating.


    Just follow These steps to enable Hibernate mode in your Windows 8 PC:
    1. You'll need to access your system's power settings, which you can do any number of ways. My preferred method: press Win-W (that's the Windows key and the letter w) to bring up the Settings Search menu, then type power.
    2. Click Change what the power buttons do.
    3. Click Change settings that are currently unavailable.
    4. Scroll down to the bottom of that window to find the "Shutdown settings" section.
    5. Click the box next to Hibernate to enable the option.
    6. Click Save changes.
    7. Now, when you go to power down your system, you'll see the Hibernate option in your list of choices. Also, in that same System Settings window (step 4), you can choose Hibernate for any of the "Power and sleep buttons and lid settings" options.
    In other words, if you want your system to hibernate when you press the power button or close the lid, this is where you can configure that setting.

    Monday, August 5, 2013

    How to Find Cheap But Reliable Web Hosting

    Looking for a reliable web hosting service provider can be a difficult task if you are not very sure about your actual needs. So how to find cheap but reliable web hosting service provider(s)? Here we would introduce some essential skills for choosing a trustable hosting service provider before making your final decision. As a member of QMS (Quick Money Saver), it is a good idea to firstly ask oneself the following 5 key questions before choosing any web hosting service provider:

    5 Key Questions For Selecting the Best Web Hosting Service Provider

    (i) Budget First.

    How much money should be used for getting your website up-and-running? Many reliable and affordable web hosting service providers can instantly turn your website into function, usually within 1 day (24 hours), by offering dedicated server, standard shared hosting (SSH) or virtual private server (VPS). Always set up your own website budget first, although web server cost is possibly not the only key factor affecting total website expense. Other operating costs may include: SEO (Search Engine Optimization), Online Advertising, Article Marketing, Special Promotion etc.

    (ii) Disk Storage Space.

    Now the second question is: How much disk storage space should your website required? It is a must to determine if your website needs large disk storage space or it can just be a simple static website that needs only lesser disk storage space. Other than disk storage space, factors like RAM available, speed or number of CPUs are also key concerns.

    (iii) Bandwidth.

    Enough bandwidth must also be a critical criteria for selection. If you have huge site traffic or need to run large data files through your website for each day, you should need dedicated server with unlimited bandwidth to avoid slow loading speed of web page(s). If you run only a simple static site with small amount of traffic, just for providing background information about your company and some contact details, you may then go for much lesser bandwidth.

    (iv) Database.

    Should your website need any MySQL database? Remember to check carefully with potential web hosting service provider if it can host a database of suitable type properly, because some systems may only host database of a few certain types. So if your website does need any reliable database, do check all necessary requirements to ensure it will run properly.

    (v) Software Scripts.

    You must make sure, if your website needs any special computer software to run certain scripts correctly, do check very carefully with potential web hosting service provider before final decision should be made. If your website needs to run under WordPress platform, then you must make sure WordPress panel can be easily installed on that web hosting system.

    After you finish asking yourself the 5 key questions mentioned above, do start visualizing your website layout and also its main purposes. It is usually necessary to have a nice navigation bar on front page with links to each internal sub-page. Consider specifically the actual function of every internal link on your website. Re-think about it over and over again so that when you actually start setting up this new system, you will not find missing any extra requirements.

    Never forget to research for multiple web hosting service providers before making any final decision. Read carefully and go through their server hardware, technical requirements, software, price level, reliability etc. Compare them one by one to find out the best suitable and affordable hosting service provider.

    Last but not least, for any QMS (Quick Money Saver), go visiting major reputable forums about web hosting, and surely you will get good pieces of useful information there on how to find any cheap but reliable web hosting service provider(s).

    Not every cheap web hosting is bad, while not every expensive web hosting is good. As a QMS (Quick Money Saver), you may try using DreamHost with special discount offer here, or at least sign-up for earning their affiliate program benefits with this link.

    Sunday, August 4, 2013

    How to Set Up WiFi Router on Windows PC

    Today I will tell you how to setup WiFi Router on windows. To do this You must be have Ethernet internet connection in your home that you’re using on your PC or laptop but now you’ve bought a new WiFi router so that you can setup Wi-Fi connection using which you’ll be accessing internet on your mobile devices. Now Days we have smartphones phones or laptops in our home which are capable of accessing internet via WiFi network. WiFi network allows devices to connect to internet wireless.

    Using below methods you will be able to configure WiFi Router on Windows XP/7/8. In these days many people have windows 7 or 8. However, Windows 8 is almost identical to the Windows 7. The only difference is at the start menu/desktop which is replaced by new Metro look. So the method I’m sharing below will work on both. You may find very minor changes in the options while using Windows 8.


    How to Setup WiFi Router on Windows PC:


    Method 1:

    1. You’ve purchased router which must be having a software CD/DVD inside its box. Insert that disc into the optical drive of your PC and install the software. If software asks for upgrade then do that so that you get latest available software.
    2. Once the software is installed then it will run automatically. Now you need to follow screen instructions to setup WiFi router. It will ask you to do setting up related stuff one by one. Make sure you didn’t miss any step.
    3. This is the simplest way to setup WiFi router on Windows Operating System. Make sure the router is plugin for power supply and the Ethernet cable is attached properly.

    Method 2:

    Since your router is compatible with Windows 7 and Windows 8, most of the steps will be done automatically. This is because the setup will be done by Windows Connect Now (WCN) tool.
    1. Start the router by adding it to power source. Open the network options by using any icon available at the notification area on your PC.
    2. All available networks will be shortly there in front of you. You can choose the default option which will connect your PC to your router. Now you need to follow few more instructions and once they are over you’ve successfully setup WiFi router on your PC.


    Note – Make sure you’re always using user name and password so that no one without your permission can connect to your WiFi connection.

    Does Deleting the Cache Actually Speed Up Your PC

    Most people assume that each one temporary files area unit simply muddle created by lousy applications, however that isn’t truly the reality. Cache files area unit created by apps to store usually used data thus it doesn’t need to be generated or downloaded once more.


    If it takes 2 seconds to access a small image file from a web server, that might be fine once in a while. But modern pages are made up of tons of little images, style sheets, and JavaScript files, most of which don’t change every day. Multiply those by all the sites you visit multiple times, and you are talking about a lot of time wasted, not to mention bandwidth. If your browser doesn’t have the full CSS immediately, it can’t start rendering the page, leading to more delays. That’s why the second time you visit a page on the same site, it displays the layout of the page very quickly. It has been cached.

    The problem can get even worse when an application needs to generate a set of info that might take a while to regenerate every time the app starts up again. Instead of doing all that initialization every time, it does it once and caches in a file. When you wipe the cache, what you are actually doing is starting all of that work over again, and slowing your computer down in the process.
    If your computer doesn’t have a ton of drive space, and your applications have created way too many temporary files, you might have a real reason to clear out the cache, or at least reconfigure your apps to use less temporary space.
    This was even more true in the days of mechanical spinning platters in your hard drive, where the latency for a hard drive to find each file would increase when there were zillions of little files to load. These days you should have a solid state drive in your computer if you are worried about performance, and random seek time isn’t a problem anymore.

    Cache corruption
    There are times when an application cache becomes corrupted, and requires a wipe to get things going again… Or perhaps the cache is just out of date and has old files — this is a big one for web browsers. This problem usually manifests itself as an issue rather than a slowdown though, so while you can fix problems this way, it isn’t the best choice for performance.

    Lousy Autocomplete
    Another reason people wipe the cache is a side effect of a badly written auto complete algorithm. Let’s say your application’s search box attempts to give you a dropdown of recent items… and the algorithm is slow and clunky. You would end up having better performance while searching to disable the history or wipe the cache, which leads people to believe that cache is bad, when the reality is that cache is good… Bad apps are bad.


    Why You Might Want to Delete Some Cache?
    Deleting the cache is definitely something you’ll want to do if you are worried about your privacy. Just keep in mind that deleting the cache will only sorta delete those files — unless you overwrite the free space, you aren’t really deleting anything permanently. All you have to do is run a few utilities, and those deleted files are most likely going to be recovered.

    Test it for Yourself
    You don’t have to take my word for it, because it is easy enough to test for yourself. Set your browser to open a set of your favorite web pages at once, record the time it takes to open them. Then wipe the cache and load the same pages again.

    So where does that leave us?
    If you want to wipe the cache, there is no harm done. Your apps will dutifully rebuild their caches quickly, and things will be humming along faster than ever in no time at all. But now you will realize that clearing cache doesn’t usually improve performance.